
Bona Belt
Technical data sheet
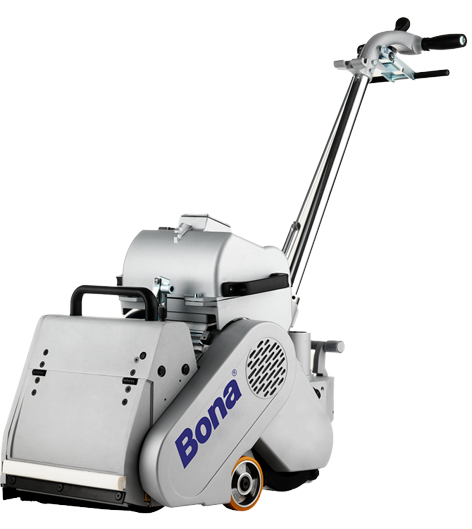
The Bona Belt sanding machine makes big jobs seem small. The compact design makes the machine simple to manoeuvre and easy to transport and it can also be disassembled and reassembled quickly and easily. The Bona Belt has a very efficient vacuum, which minimises dust. The Bona Belt comes in different versions, according to your needs – that’s freedom of choice. For sanding all kinds of wooden and parquet floors.
- Unique construction with a simple change of drums with either a 200 mm or a 250 mm width.
- Ergonomic designed handle facilitates raising and lowering of the drum.
- Reversible motor for 1-phase (230V) alt. 3-phase (400V). Or only 1-phase (230V).
- Large front and side covers make the drum and tension roller easy to reach.
- Very efficient vacuuming.
- The compact design makes the machine simple to manoeuvre and easy to ransport.
Technical data
- Drum width: 200 alt. 250 mm
- Sanding belt size: 200 x 750 mm alt. 250 x 750 mm
- Motor power: 1-phase 2.2 KW with Easy start
- Total weight: 74 kg
- Drum revolutions: 1750 rpm
- Dust discharge: < 2 mg / m3 air
For further technical data please see the machine manual.
Directions for use
Attach the dust bag according to the instructions in the manual. After that it is time to put on the sanding belt for rough sanding. Raise the working handle to its highest position on the sanding machine so that the sanding drum doesn’t touch the floor. Lift the front cover so that you can see the sanding drum and put on the sanding belt. If the sanding belt has arrow markings on the inside the belt must be fitted with the arrows pointing in the direction of rotation of the drum (forwards). Note: Bona abrasives can run in both directions.
When sanding parquet floor you may start with grit 40. An old solid floor of fir or pine may be rather more uneven, and you may have to start with a coarser sanding paper e.g. grit 24. Check that the sanding drum is raised and connect the cable in the power socket. There should be a slow fuse of 16 A. And for your own safety always use an earth leakage circuit breaker.
Now you are ready to start sanding. Start the machine and let it run for a few seconds so that the dust bag is filled with air and the motor reaches full speed.
You should start at a long wall and work from the left to the right. Walk slowly forwards and lower the sanding drum. The machine will begin to sand as soon as the drum touches the floor. Go on until you have nearly reached the wall. Lift the working pressure handle so that the drum is above the floor, go slightly backwards lower the drum again carefully. Continue the sanding in the same track backwards. Do the remaining floor by going forward and backward with the sanding machine. Overlap with a few cm in the previous sanded area when you are sanding forwards again.
Never stand still with lowered drum, because ugly marks will be made on the floor. Finish the sanding when the machine is still moving by lifting the working pressure handle and the sanding drum is lifted from the floor. Put the working pressure handle upwards/backwards to its starting position. Keep the cable away from the moving parts of the machine.
Common parquet floors should be sanded in the longitudinal direction of the wood. It can be of an advantage to sand solid floors diagonally with the rough sanding paper and after that with finer paper in the longitudinal direction. After the first rough sanding all old lacquer should have gone. The following sandings makes the surface of the floor even and removes the scratches from the original coarse sanding.
Note: To avoid deep scratches wood should never be sanded at 90o to the grain direction.
The belt sander doesn’t reach all the way to the wall. Instead you should use an edge sanding machine. Use the same grit size of abrasive as for the belt sander. Start sanding with rotation movements, from links to right clockwise. Don’t press the machine downwards; let it work with its own weight.
To remove the lacquer in the corners you should use a bladed scraper or detail sander. Now you have finished the first sanding of the floor.
Vacuum the floor properly so that it is absolutely clean before continuing. Check if there is any damage to the floor that needs to be repaired. If this is the case you can fill any imperfections/gaps with wood filler.
Dust reception
For minimal dust discharge Bona’s original dust bags are used. The dust bag should be emptied when filled to one third of its size. (Use face mask min class P2.) After each completed sanding, the dust bag should be emptied and the contents kept outdoors due to potential fire hazard. Regularly check the intake duct to make sure it is not obstructed by dust, glue and lacquer remnants and that the dust brushes are functional.
Periodic maintenance
Check that the cable can support an area of at least 3 x 2,5 mm2 at 1-phase and 5 x 1,5 mm2 at 3-phase drive. If the motor receives a weak power supply or for other reasons becomes overloaded, over load protection will be released. NOTE! Prior to restart, the motor must cool down.
Sanding drum, tensioner system and machine wheels must be cleaned regularly. Service and maintenance except for periodic routines must be made by Bonai or an authorized workshop.
|
FLOOR SANDER HIRE BRISTOL PRICE LIST |
|||||
|---|---|---|---|---|---|
|
MACHINES |
1 DAY |
2 DAYS |
3-7 DAYS
(rate per extra day) |
WEEKEND SPECIAL
(Friday afternoon to Monday 9.15 a.m.) |
|
|
Bona Edger Sander |
£65.00 |
£125.00 |
£55.00 |
£125.00 |
|
|
Bona Belt Sander |
£95.00 |
£185.00 |
£85.00 |
£185.00 |
|
|
Bona FlexiSand |
£120 |
£230 |
£110.00 |
£230.00 |
|
Lorem ipsum dolor sit amet, consectetur adipiscing elit. Ut elit tellus, luctus nec ullamcorper mattis, pulvinar dapibus leo.